Optimize Those Images
by Cynthia Teeters on November 03, 2022

Arcane Wiki Demo With Image Resize On Upload to Cloudinary
This project originally came from a tutorial, How to Optimize Images on Netlify with the Cloudinary Build Plugin by Colby Fayock.
His YouTube video is here: Automatic Image Optimization on Netlify with the Cloudinary Build Plugin
In his written and video tutorials he explains how to use his demo repo to deploy to Netlify and make use of a Netlify build plugin titled Cloudinary, which he wrote.
I'd like to stop for a moment and give a big Thanks to Colby for writing the plugin and making the tutorial.
The reason for this article is, I've included an additional feature to the project by creating an upload preset in Cloudinary that resizes the images to a smaller size so that the site's performance is improved.
This article, then, is a continuation of Colby's tutorial, but with that additional feature.
Getting Started Locally
After cloning the repo, go ahead and install the dependencies and bring up the page so that you can see the images you're working with.
- Install dependencies
npm install- Start a local development server
npm run dev- Open the site in your browser at localhost:3000
Creating a Signed Cloudinary Preset for Upload
Cloudinary has two types of presets: upload and transformation. Transformation presets are used to apply transformations to images that are already in Cloudinary. Upload presets are used to upload images to Cloudinary. For this demo, we'll create an upload preset.
- To become more familiar with Cloudinary's presets, you can follow the video tutorial to make a Transformation Preset at Create Transformation Presets in Cloudinary's DAM System.
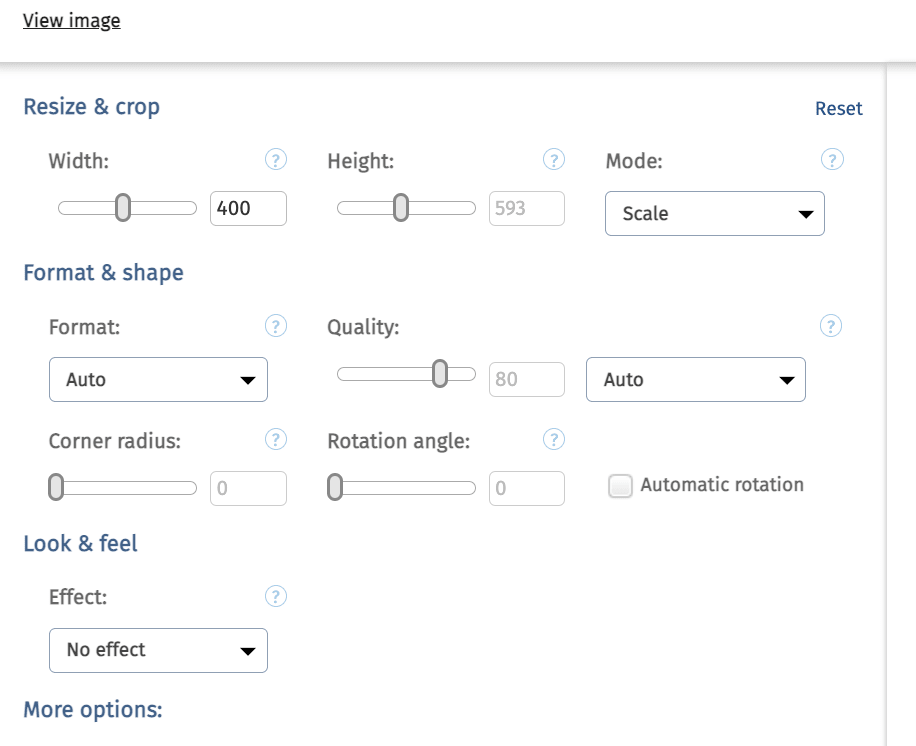
- You need not create the exact one from the tutorial. I suggest you create a Preset that crops the image to a 400px wide image, crop mode scale, and auto quality.

-
Once you know how to create a preset, you'll have to make one in the Settings -> Upload panel. Settings is the gear icon
in the top-right of the screen.
-
You can find more information at Managing upload presets for developers
-
Cloudinary has two types of upload presets: unsigned and signed. Unsigned presets are public and can be used by anyone. Signed presets are private and can only be used by the account that created them. For this demo, we'll create a signed preset.
-
Edit Upload Manipulations -> Incoming Transformation:
-
Set it to
signed -
Set the transformations to
c_scale,q_auto,w_400 -
Save the upload preset giving it the name
arcane.
- You should also make sure that your Strict transformations setting is set to
Disabledin the Settings -> Security panel.
- Once you've created the preset, you'll need to get the Cloud Name and the API key and API secret from your Cloudinary account. You can find these in the Cloudinary dashboard (see below).
Deploying to Netlify
- Deploy to Netlify using the build defaults it finds in the package.json file.
- It will first deploy without Cloudinary.
- Consider renaming your site after a successful deploy.
Configure the Netlify Build Environment with Your Cloudinary Account Information
- Login to your Cloudinary account.
- In the Dashboard take note of your Cloud Name, API key, and API Secret.

- In Netlify go to Site settings -> Build & deploy -> Environment
- Add values for the CLOUDINARY_CLOUD_NAME, CLOUDINARY_API_KEY and CLOUDINARY_API_SECRET to your Netlify build environment. You can assign them to all scopes.
Install the netlify-plugin-cloudinary plugin
- Go to your Netlify Team Overview page.
- Click the
Integrationsmenu button. - Search for Cloudinary.
- Click the
Add build pluginbutton for the selection.
Cloudinary
Automatically optimize your Netlify site images and deliver them in modern formats with Cloudinary.
- Choose the site you want to add the plugin to.
- If successful, the plugin will appear on the site's plugin page
Add the netlify.toml file to your repository
- Create a netlify.toml file in the root of your repo loading the netlify-plugin-cloudinary plugin.
[[plugins]]
  package = "netlify-plugin-cloudinary"

  [plugins.inputs]
  cloudName = "YOUR_CLOUDNAME"
  deliveryType = "upload"
uploadPreset = "arcane"- Make sure the cloudName matches your Cloudinary Cloud Name.
- Push the changes to GitHub.
- Monitor the Netlify build log looking for the Cloudinary plugin.
- If something goes wrong and you want to build again, delete the created image folder from Cloudinary before your next push.
Checking for Successful Plugin Installation and Deploy
There are multiple indications that the plugin deployed successfully.
- The Netlify deploy log shows successful plugin actions.
- There is a new folder in your Cloudinary with the files from this repository.
- The images in the site are served from Cloudinary.


